Stackby now lets you automate Slack communication directly from your stack using built-in Slack automation actions. This means you can send messages to channels — no manual follow-ups needed.
With Slack automations, you can:
Send messages to Slack channels
This guide walks you through everything — from connecting your Slack account to setting up and enabling automations in Stackby.
Before using Slack actions, you must connect your Slack workspace.
Open the Stack where you want to set up automation.
Go to Automations.
Click + Create New Automation.
Select a Trigger (for example: When a record is created, When a record enters a view, or When a field is updated).
Test the trigger to make sure Stackby is receiving data.
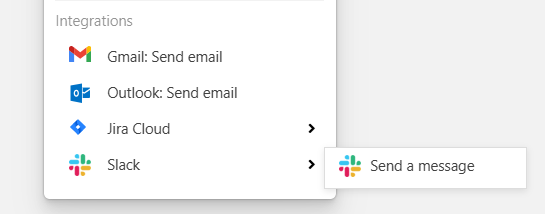
Click Add Action → choose Slack.
Click Connect Slack Account.
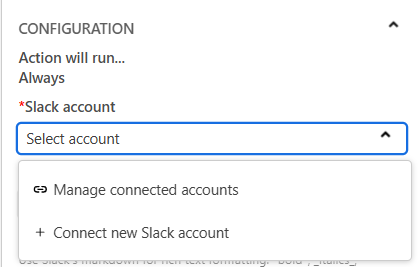
Log in to your Slack workspace and authorize Stackby.
Stackby will request permission to post messages on your behalf.
Once authorized, your Slack workspace will be available for automation use.
Your Slack account is now connected and ready.
This action automatically posts messages to a selected Slack channel.
In your automation, add an action → Slack: Send a Message.
Select your connected Slack workspace.
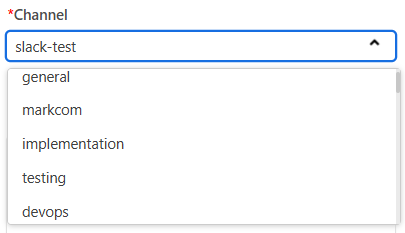
Choose the Channel where the message should be sent.
Public channels are listed by default.
The Stackby app must be added to private channels manually in Slack.
Compose your Message Text.
You can insert dynamic values from Stackby fields (e.g., task name, owner, status).
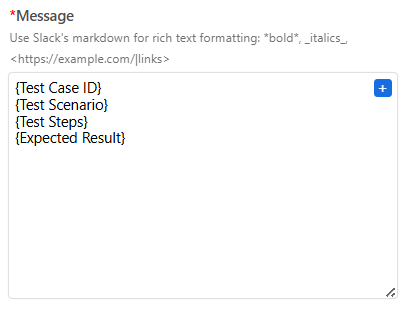
(Optional) Add formatting:
Line breaks
Emojis
Links
Test the action.
Save and turn ON the automation.
Every time the trigger runs, Stackby will post a message in the selected Slack channel.