Data Flow in Stackby helps you visualize how data moves between different tables, columns, and connected records. It provides a clear view of relationships and dependencies within your Stack, making it easier to understand how your data is connected.
Go to your Stack in Stackby
Open the required table or workspace
Click on “Tools” and Select “Apps” (available in the top-right corner or sidebar)
To use the Data Flow app, you need an account on Data Flow
Go to dataflow.com and create an account (if not already created)
Return to Stackby
Enter your Data Flow account credentials
Click on “Sign In”
Open DataFlow app from your Apps section.
Click the “Create your first request” button.
You will be taken to the request configuration page.
This is where you define how the API call should work.
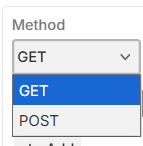
The Method defines what action you want the API to perform.
Most used options:
GET → Fetch data
POST → Create/send data
The URL is the API endpoint from which Stackby will pull the data.
Example: https://api.app.com/v1/users

Parameters are query values added to refine the response.
Examples:
limit number of records
filter by status
select date ranges
Click + Add to include multiple parameters.

Headers pass extra metadata with the request.
Common examples:
Content-Type: application/json`
Accept: application/json`
Used mostly with POST / PUT / PATCH. This is where you send data to the server in JSON or other formats.
For GET requests, this is typically empty.
Example:
json
{
"title": "New Task"
}
If the API is private, authentication is required.
Common options:
API Key
Bearer Token
Basic Auth
OAuth
Without authorization, the request may return errors like 401 Unauthorized.
Here you choose:
* The table where data will be stored
* The view where results will appear
This ensures the records land exactly where you want them.
You can automate the import.
Schedule → Run automatically at fixed intervals
Trigger → Run from automation
Webhook URL → External services can start the fetch
Determines how Stackby handles incoming records.
Append: Adds new rows without touching existing ones.
Update: Updates existing records based on matching conditions to avoid duplicates.
After setup:
1. Click Save & Run.
2. Data will be fetched from the API.
3. Visit the selected table to verify.
Use Run History to debug failures.